[Vue] Vue的生命週期 Lifecycle hooks
前言
第一篇Vue的筆記記錄,就來釐清Vue頁面的…生老病死。讓我們想在它出生時就賦予它怎樣的能力還是死掉前叫它做什麼@@…就是任人擺布的人生啦!(誤)…
因為目前為Vue2到Vue3的過渡期,Vue3還沒有很普及主要的資訊是從官方文件,整理的資訊還是會以Vue2為主。
Vue的生命週期hooks
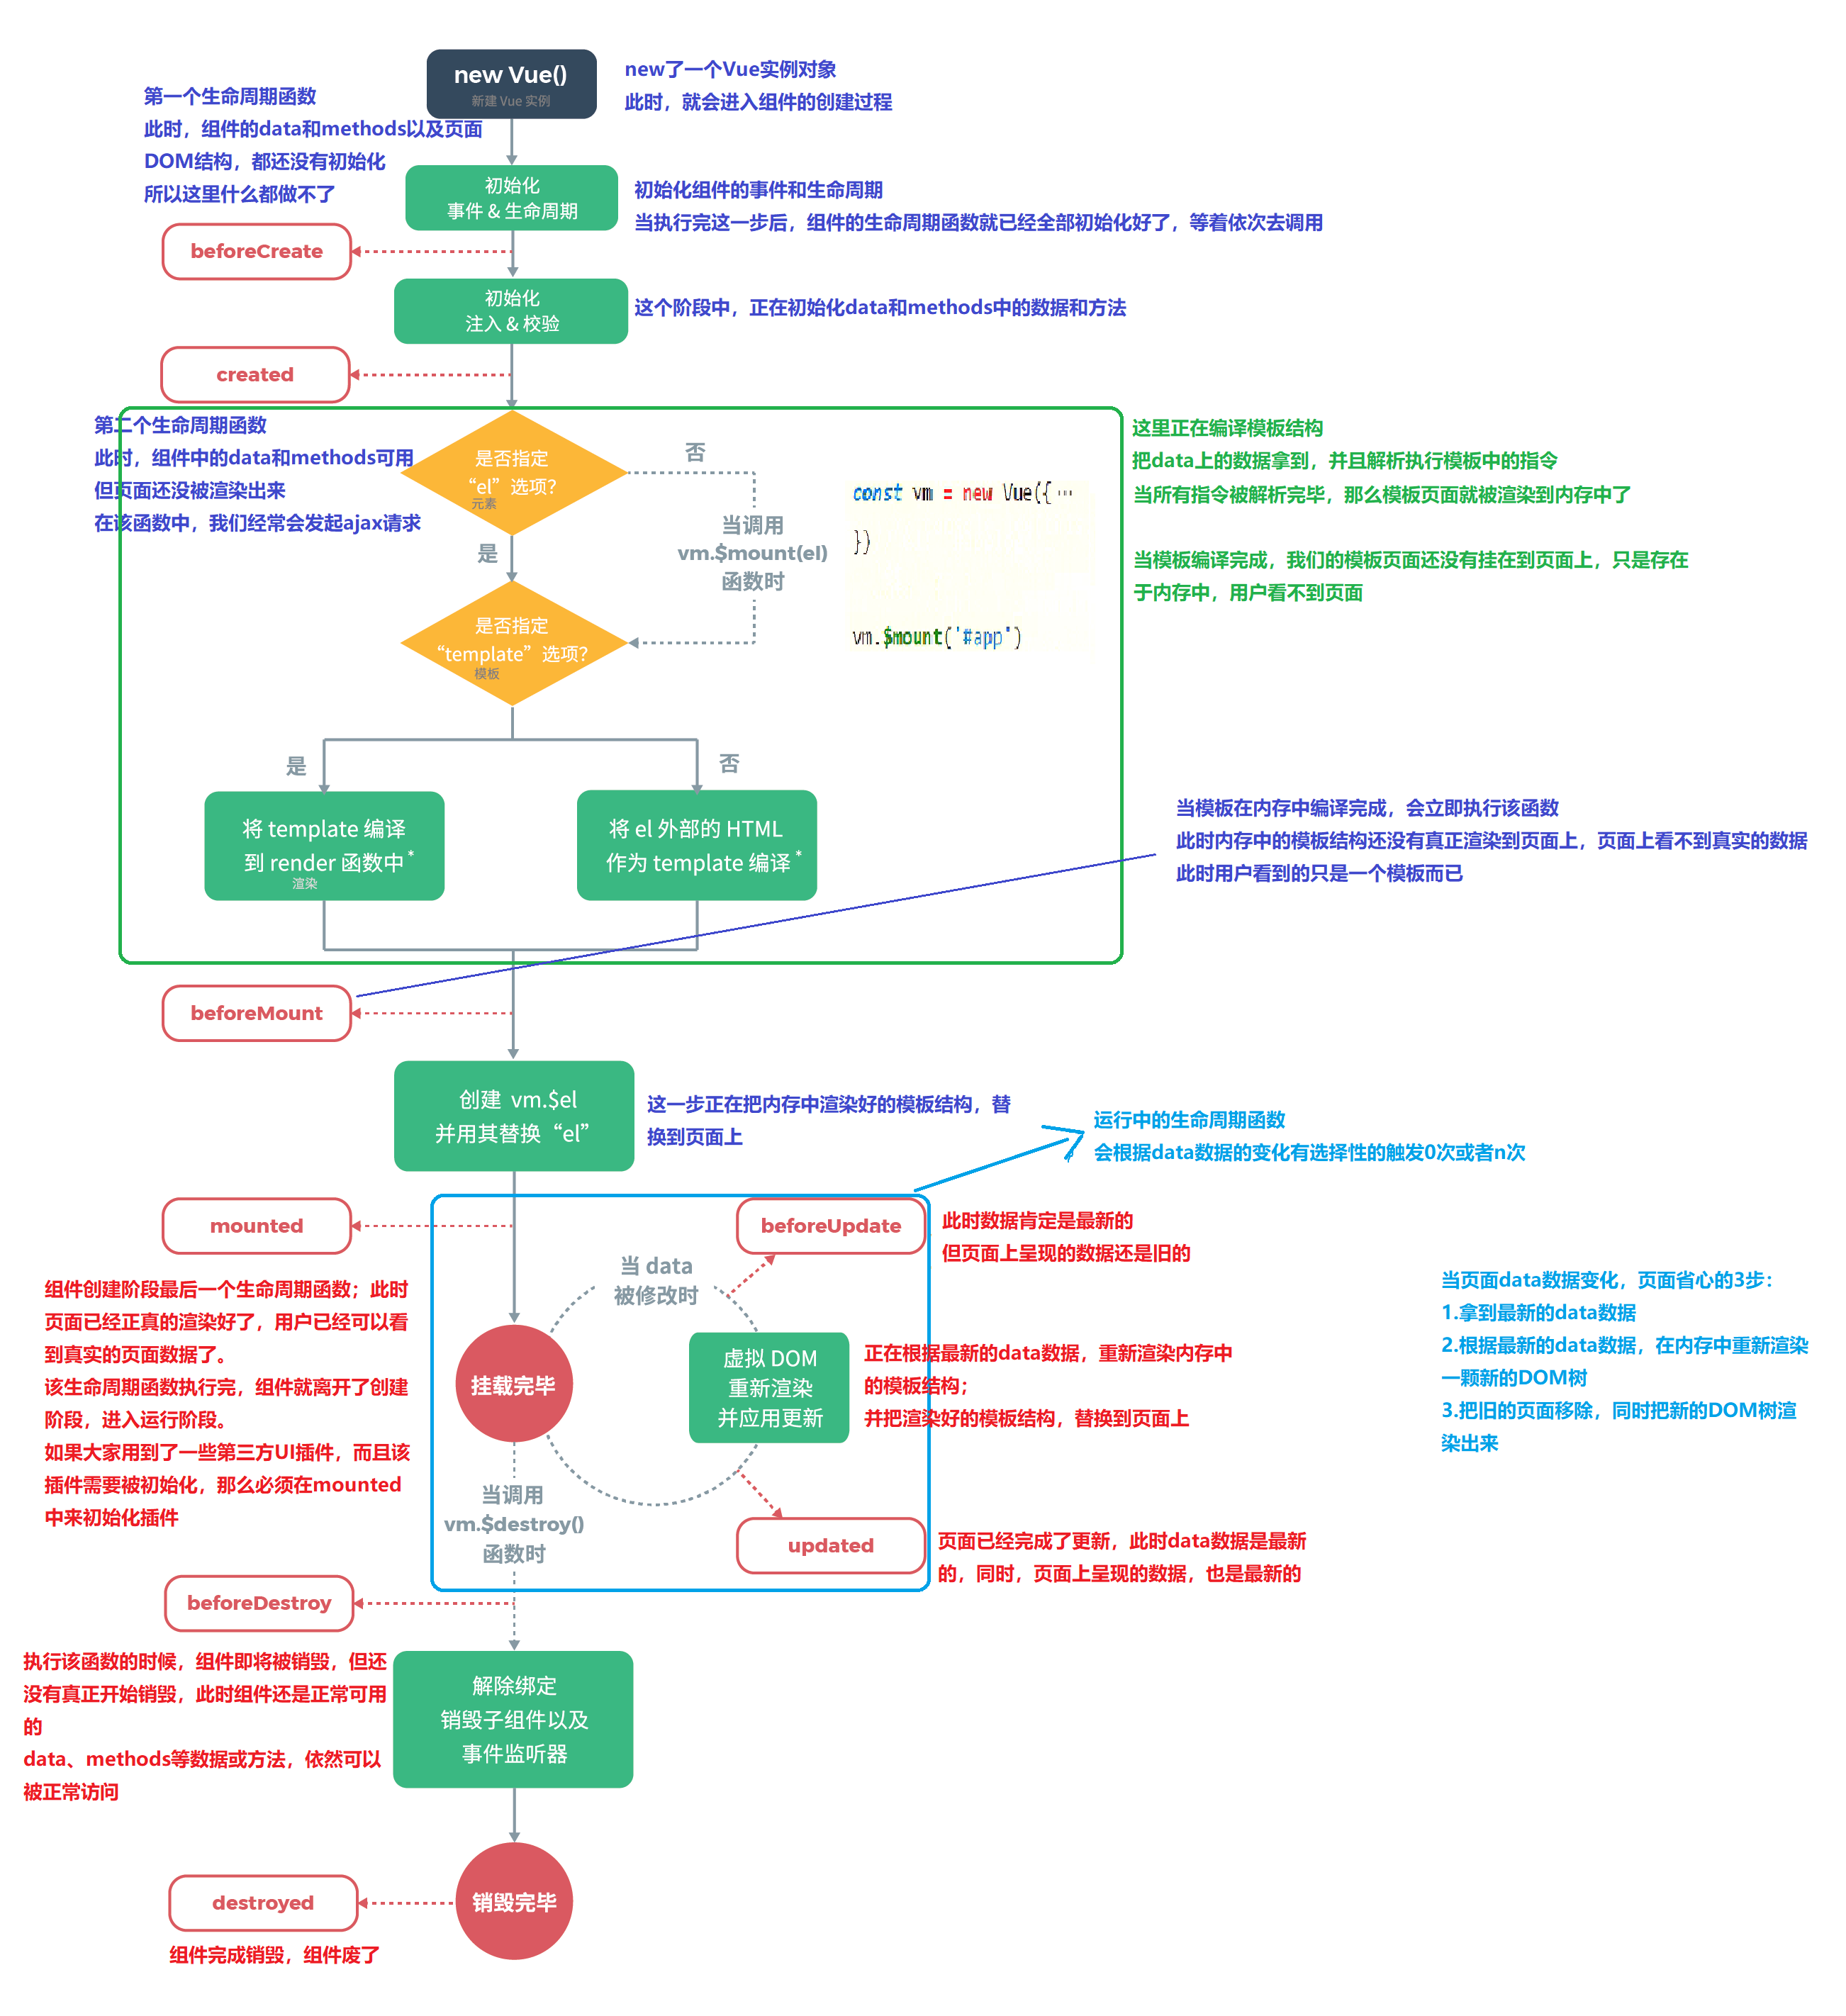
Vue的生命週期包含了幾個時間點事件(hooks),beforeCreate、created、beforeMount、mounted、beforeUpdate、updated、beforeDestroy(Vue3-beforeUnmount)、destroyed(Vue3-unmounted),我們可以在這些不同的時間點底下註冊不同的函式方法,來控制Vue(注意:註冊的函式不要使用箭頭函式,因為沒有this的指向)。另外還有搭配keep-alive元件使用的activated、deactivated。Vue3新增的errorCapture來補獲子元件的錯誤、renderTracked、renderTriggered測試用。
生命週期圖
Vue2的生命週期圖
Vue3的生命週期圖
1. Create階段
beforeCreate
實例初始化之後,this指向創建的實例。
此時無法讀取data、watch、computed、methods,頁面DOM結構也還沒初始化。
created
實例創建完成,導入數據data、props、computed。data、watch、computed、methods可用,頁面DOM結構還沒被render出來,且$el和$ref屬性還不存在。
常用來發送AJAX請求。若在此階段進行的DOM操作一定要放在Vue.nextTick()的回調函數中。
2. 掛載 Mount
判斷是否有$el屬性,若沒有則使用$mount掛載el,接著判斷是否有$template屬性,若有則直接render template,沒有就使用el外層的HTML作為template。
beforeMount
$el初始化,對應的template已在內存編譯完成,但還沒render到頁面上。
mounted
vm.$el創建完成,DOM掛載Vue、雙向綁定和畫面Render完成,可對DOM、$ref操作。如果有用到一些第三方插件,必须在mounted中来初始化插件。
3. update 更新階段
當data發生變化,畫面需要重新Render時
beforeUpdate
當data發生變化被呼叫使用,data是新的,但新畫面還未被Render,可操作舊畫面的DOM,例如手動移除添加事件監聽。
updated
data是新的,新畫面被render出來了。
請勿在此去更改data,不然就會無限迴圈了。
4. Destroy / Unmount 卸載
當呼叫 destroy / unmount 函式時,則會執行卸載的動作
beforeDestroy (Vue3 改為 beforeUnmount)
執行卸載前,此時data和方法等都是完整功能可使用的。可用來關閉計時器、移除在全域綁定的時間,移除自訂事件監聽、刪除提示等等。
destroyed(Vue3 改為 unmounted)
卸載完成。Vue實例銷毀,所有的DOM元素綁定被解除、移除監聽事件、Vue child 實例也被一併銷毀。無法再對實例進行任何操作。
父元件和子元件的生命週期
掛載與Render
父 beforeCreate -> 父 created -> 父 beforeMount -> 子 beforeCreate -> 子 created -> 子 beforeMount -> 子 mounted -> 父 mounted
子元件update
父 beforeUpdate -> 子 beforeUpdate -> 子 updated -> 父 updated
新增子元件2
父 beforeUpdate -> 子2 beforeCreate ->子2 created -> 子2 beforeMount -> 子2 mounted -> 父 updated
父元件update
父 beforeUpdate -> 父 updated
卸載 unmount
父 beforeDestroy -> 子 beforeDestroy -> 子 destroyed -> 父 destroyed
父元件監聽子元件的生命週期
當父元件Parent監聽到子元件 Child的mounted、created、updated就做某件事
1 | // 需要手動通過 $emit 觸發父元件的事件 |
activated 和 deactivated
activated 和 deactivated hook只有在有<keep-alive>元件時才會出現的,我們先來了解<keep-alive>是什麼
keep-alive 元件
當使用<keep-alive>包住頁面中元件時,此元件就不會執行卸載(destroy or unmount),可以維持元件資料狀態,重新點選到時不會再次載入。處理緩存(cache)的方案。
三種props:
- include: 包含這些名稱的元件都要緩存,其他都不要緩存。
- exclude: 除了這些名稱的元件不要緩存,其他都要緩存。
- 可帶入字串,陣列或正規表達式來判斷
- 判斷名稱一般是元件的name,若無設定name,則會查找它的局部註冊名稱(the key in the parent’s components option) 。anonymous component 不能被查找。
1 | <!--字串 以逗號作為分隔 --> |
- max: 緩存元件數量上限。當達到設定的數值,新實體還未創建前(beforeCreated),最舊的實體會被銷毀。
1 | <keep-alive :max="10"> |
- 要注意的是,
不會在 functional component 中正常運作,因為他們沒有實體。
下面這個DEMO
因為有在元件pages用keep-alive,點擊其他元件時,元件pages緩存不會被卸載,所以點回元件pages畫面會在剛剛閱讀的文章上,若沒設置keep-alive則會重新載入到預設的畫面。
activated 和 deactivated
當使用<keep-alive>包住頁面中元件時,此元件就不會執行卸載(destroy or unmount),而會有兩個對應的hooks,當元件觸發時activated 和 停用時deactivated。
對應兩個鉤子函數 activated 和 deactivated ,當組件被激活時,觸發鉤子函數 activated,當組件被移除時,觸發鉤子函數 deactivated。
Vue3
另外Vue3新增的errorCapture來補獲子元件的錯誤、renderTracked、renderTriggered測試用,因為還沒實際用過,往後會再補上。
參考資料
[Vue] Vue的生命週期 Lifecycle hooks
![[Vue] Vue的生命週期 Lifecycle hooks](/gallery/012.jpg)